Mimi, Toutou, and Kingani
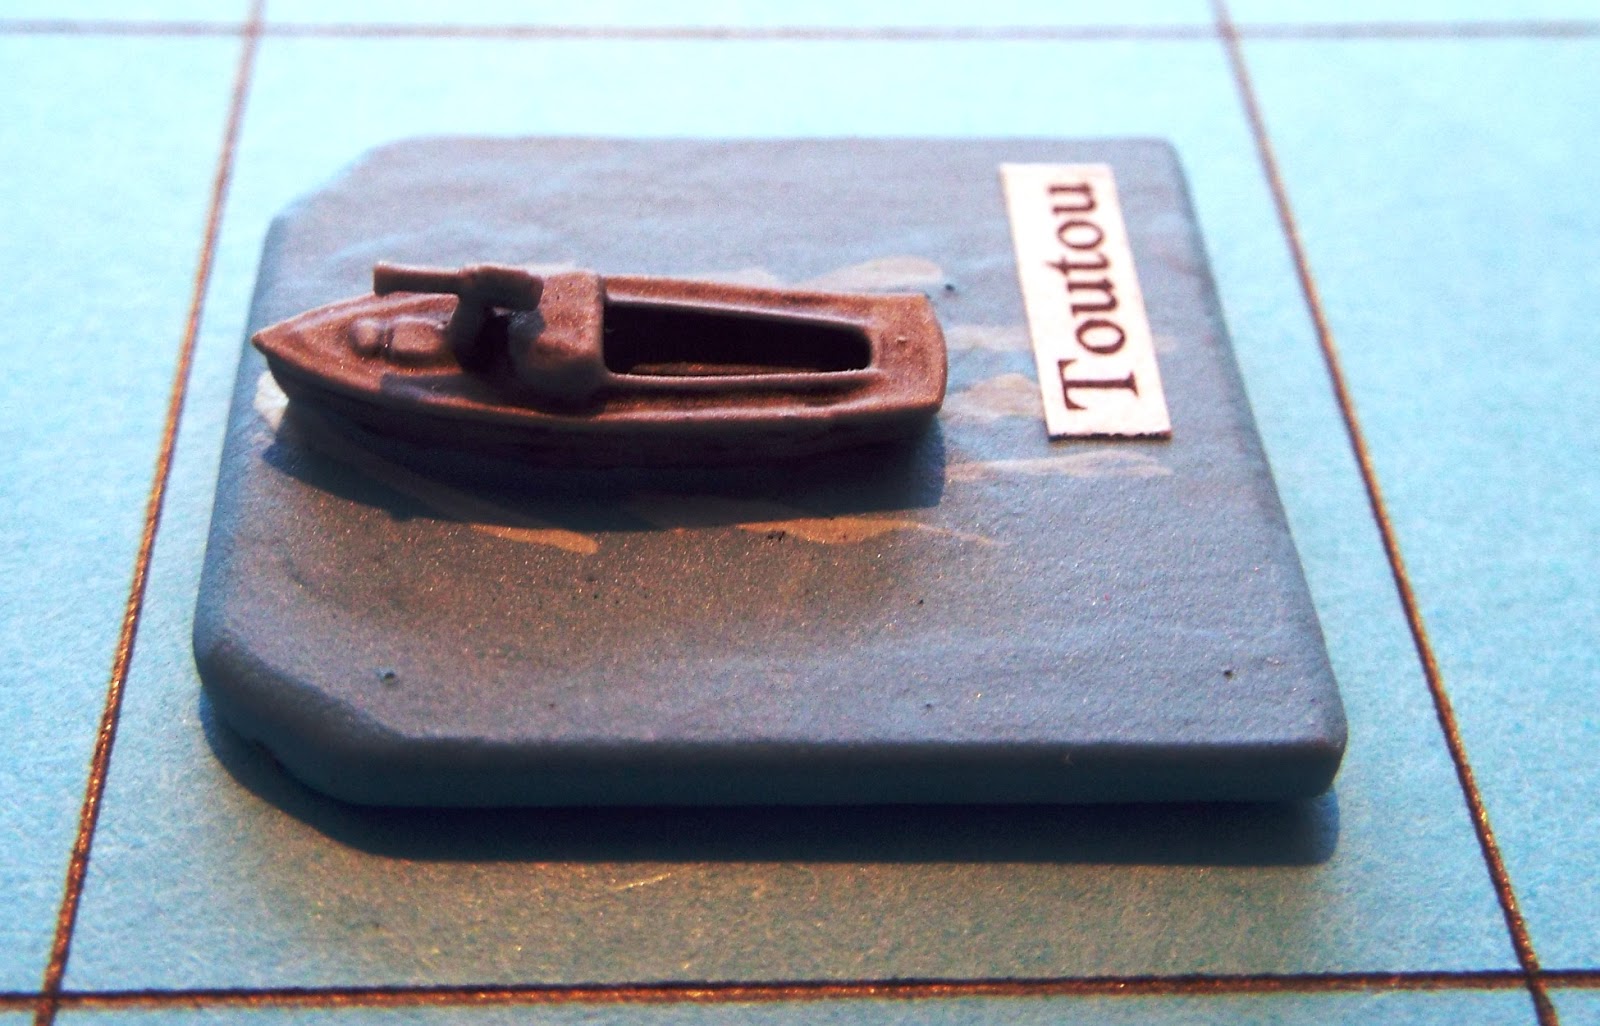
Posted: May 16, 2018 Filed under: Colonial, Modelling, Warships, World War I 18 CommentsThe models I am using are approximately 1:600th-scale and were built from various bits and pieces I had in my spares box; in other words, some spare ships’ boats and light guns from Airfix warship kits. For ease of handling they were stuck on pieces of Plasticard and labelled. They are not the most beautiful models I have every built, but they serve me well enough in several tabletop battles.
Mimi

Toutou
Kingani

The story of how Mimi and Toutou got to a lake in the centre of Africa is an epic tale that inspired C S Forester to write THE AFRICAN QUEEN and would make a wonderful film.
The Zeebrugge and Ostend Raids: The blockships
Posted: April 30, 2018 Filed under: Early 20th Century, Late 19th Century, Warships, World War I 6 Comments
Their characteristics when built were:
- Displacement: 3,600 tons
- Dimensions:
- Length: 314′ (96m)
- Beam: 43′ 6″ (13.26m)
- Draught: 17′ 6″ (5.33m)
- Speed: 19.75 knots
- Complement: 273 to 300 officers and men
- Armament: 2 × 6-inch (152mm) QF Guns; 6 × 4.7-inch (120mm) QF Guns; 8 × 6-pounder QF Guns; 2 or 4 × 14-inch (360mm) Torpedo Tubes
By the time that HMS Dreadnought was launched, the protected cruisers were already becoming obsolete, and seven of the class (HMS Andromache, HMS Apollo, HMS Intrepid, HMS Iphigenia, HMS Latona, HMS Naiad, and HMS Thetis) were converted into minelayers in 1907.
Six of the class were converted into blockships for the Zeebrugge and Ostend raids. These were:
- HMS Intrepid: Expended at Zeebrugge
- HMS Iphigenia: Expended at Zeebrugge
- HMS Thetis: Expended at Zeebrugge
- HMS Brilliant: Expended at Ostend (1st raid)
- HMS Sirius: Expended at Ostend (1st raid)
- HMS Sappho: Intended to be used at Ostend (2nd raid), but broke down on the way and not used
HMS Intrepid

HMS Iphigenia

HMS Thetis

HMS Brilliant

HMS Sirius

HMS Sappho

To prepare them for their use as blockships, the vessels were stripped of most of their armament and many compartments were filled with concrete. The extent of the damage inflicted on the blockships during the raids can be gauged by the following photograph:

The Zeebrugge and Ostend Raids: The Mersey ferries
Posted: April 28, 2018 Filed under: Early 20th Century, World War I 6 CommentsOf the Mersey ferries that were available, the Iris and the Daffodil (later the Royal iris and the Royal Daffodil) were selected. They had been built in 1906, and were twin-screw vessels powered by reciprocating engines that gave them a top speed of 12 knots. They were equipped with flying bridges that were fitted with docking cabs to with port and starboard, and they were steered from the bridge.
Iris


Daffodil

Once taken into naval service they were modified so that they could each carry up to 1,500 military personnel. The modifications included:
- The removal of all furniture;
- The fitting of armour plate to vulnerable areas of the vessel;
- Being painted grey.
HMS Iris

HMS Daffodil

During the raid on Zeebrugge, the Daffodil helped to keep HMS Vindictive alongside the mole by pushing the cruiser with her bows. This also enable the Royal Marines she was carrying to cross over to the Vindictive so that they could land. The Iris attempted to land its contingent of Royal Marines directly onto the mole just ahead of the Vindictive. This proved to be very difficult, and eventually she was ordered to withdraw. At this point she was hit by two large shells, which destroyed one of the docking cabs and part of the bridge.


After the raid the two ships were returned to their owners, and 17th May, 1918, they sailed back into the Mersey, where they were rapturously received by large crowds of local people.
After the war had ended, both vessels were given permission by King George V to add the prefix ‘Royal’ to their names. The Royal Iris became a river cruise boat on the Mersey in 1923, and in 1931 she was sold to Cork Harbour Commissioners, who renamed her Blarney in 1937. She served her new owners well and was not withdrawn from service until 1961. In 1932 the Royal Daffodil also became a Mersey-based river cruise boat, but when she was sold to the New Medway Steam Packet Company in 1934, she moved south to the River Medway. Her service there lasted until 1938, when she was sold and broken up.
The Zeebrugge and Ostend Raids: HMS Vindictive
Posted: April 25, 2018 Filed under: Early 20th Century, Late 19th Century, Warships, World War I 8 Comments
The Arrogant-class protected Cruisers as built.
By the outbreak of the First World War, the design of the Arrogant-class Protected Cruisers was obsolete, and only HMS Vindictive took an active part in the conflict. HMS Gladiator had sunk in 1908 as a result of a collision with the merchant ship SS Saint Paul, whilst HMS Arrogant had become a Submarine Depot Ship in 1911 and HMS Furious had been paid off and hulked in 1912. (She was renamed HMS Forte in 1915 to release the name for the new Light Battlecruiser that was being built.)
The ship’s characteristics were:
- Displacement: 5,750 tons
- Dimensions:
- Length: 342′ (104.2m)
- Beam: 57′ 6″ (17.5m)
- Draught: 20′ (6.1m)
- Propulsion: 2 x vertical triple-expansion steam engines (10,000shp) using steam generated by 18 Belleville water-tube boilers, driving 2 propellers
- Speed: 19 knots
- Complement: 480
- Armament:
- When built: 4 × 6-inch (152 mm) QF Guns; 6 × 4.7-inch (120 mm) QF guns; 8 × 12-pounder (3-inch/76mm) QF Guns; 3 × 3-pounder (47mm) QF Guns; 5 x Machine Guns; 3 submerged 18-inch (450mm) Torpedo Tubes
- By 1914: 10 × 6-inch (152 mm) QF Guns; 8 × 12-pounder (3-inch/76mm) QF Guns; 3 × 3-pounder (47mm) QF Guns; 5 x Machine Guns; 3 submerged 18-inch (450mm) Torpedo Tubes
- At the time of the Zeebrugge Raid: 1 x 11-inch (280mm) Howitzer; 2 x 7.5-inch (190mm) Howitzers; 2 x 6-inch (152 mm) QF Guns; 16 x 3-inch (76mm) Stokes Mortars; 5 x Pompom Guns; 16 x Lewis Machine Guns; Flamethrowers
- Armour:
- Deck: 1.5-inch to 3-inch (38mm to 76mm)
- Conning tower: 9-inch (229mm)

One of the 7.5-inch Howitzers and several of the 3-inch Stokes Mortars fitted to HMS Vindictive.

HMS Vindictive on her return from Zeebrugge.

The damage done to HMS Vindictive during the raid can be clearly seen in this photograph. The large box-shaped structure to the right of the bridge in this photograph housed one of the large flamethrowers.
After her heroic service during the Zeebrugge Raid, the very badly damaged HMS Vindictive was expended as a blockship during the second raid on Ostend.
Zeebrugge and Ostend Raids: One hundredth anniversary
Posted: April 23, 2018 Filed under: World War I 16 Comments
I first became aware of the raid when – as a young child – I saw the model of HMS Vindictive in the Imperial War Museum as she was at the time of the raid. As I grew older I read more and more about the events of 23rd April 1918, and it has become a scenario that I have always wanted to recreate on the tabletop but never quite got around to. More recently my wife discovered that one of her relatives – Able Seaman Sydney G Digby (J36259) – was one of the Royal Navy volunteers who took part in the raid, and who was killed very early on in the action.
The Zeebrugge Raid
The raid on Zeebrugge began with an assault on the mile-long mole. This was intended to disrupt the German defences – particularly the gun batteries on the mole – and was undertaken by a mixed force of Royal Navy personnel and Royal Marines.
The main assault force was carried aboard the heavily modified Arrogant-class cruiser HMS Vindictive. Additional troops were carried aboard the requisitioned Mersey ferries Daffodil and Iris. Two obsolete C-class submarines (C1 and C3) that had been turned into floating bombs by the addition of five tons of explosives in their bows, were tasked with crashing into the viaduct that connected the shore to the mole. Once in place, the explosives were to be detonated after the crews had been evacuated by motor boats.
To help to obscure events from the shoreside defenders and coastal defence batteries, motor launches and coastal torpedo boats were fitted with smokescreen equipment developed by Wing Commander Brock (of the famous family of firework manufacturers) and were supposed to lay a dense smokescreen offshore.
Whilst this diversionary attack was taking place, three old cruisers that had been converted in blockships – HMS Thetis, HMS Intrepid, and HMS Iphigenia – were supposed to sail into the mouth of the Bruges-Zeebrugge canal and then be scuttled so that they blocked it.

Things began to go wrong as soon as the operation began. The wind blew the smokescreen out to sea rather than inland, and the Vindictive came alongside the mole in the wrong place. Many of the assault force were killed before they even made it ashore, and those that did had a very hard fight in their hands trying to beat off the German defenders and to reach and neutralise the mole gun batteries before the blockships arrived.

The three blockships did manage to reach the outer entrance to the canal but sank before they had blocked it completely. One of the submarines – the C3 – did manage to reach the viaduct (the other had not managed to reach Zeebrugge in time due to a broken tow rope) and when its explosive charge went off, it not only destroyed the viaduct but also killed a number of German bicycle troops that were crossing it at the time.


The raid was not a 100% success – the Bruges-based submarines and destroyers were soon able to use the canal again after some dredging work had taken place and the canal entrance had been widened – but it took place at a time when even a reasonably successful aggressive action was welcomed by the British government.
Of the 1,700 men involved in the operation, 227 were killed and 33 wounded. Eight Victoria Crosses were awarded, and the recipients were:
- Major Edward Bamford DSO (Royal Marine Light Infantry)
- Lieutenant Commander George Nicholson Bradford (Royal Navy)
- Commander Alfred Francis Blakeney Carpenter (Royal Navy)
- Lieutenant Percy Thompson Dean (Royal Navy Volunteer Reserve)
- Sergeant Norman Augustus Finch (Royal Marine Artillery)
- Lieutenant Commander Arthur Leyland Harrison (Royal Navy)
- Ordinary Seaman Albert Edward McKenzie (Royal Navy)
- Lieutenant Richard Douglas Sandford (Royal Navy)
The Ostend Raids
The attack on Ostend was an altogether smaller affair and involved a much smaller force. Only two blockships were involved – HMS Sirius and HMS Brilliant – and there was no assault by Royal Navy personnel or Royal Marines. There was considerable fire support from four Lord Clive-class and three M15-class monitors and they engaged the German coastal defences.
Just as at Zeebrugge, the smokescreen was blown away from the land by the prevailing wind, and meant that the blockships could not see their target. They tried to navigate by dead reckoning and using a navigation buoy that marked the channel towards the canal. Unfortunately, the buoy had been moved by the local German commander and both ships ended up sinking in the wrong place.
This raid was a total failure, and a second raid was mounted on 10th May in which HMS Vindictive was used as the blockship.

A further three Victoria Crosses were awarded for the second raid. The recipients were:
- Lieutenant Commander Roland Bourke DSO (Royal Navy Volunteer Reserve)
- Lieutenant Victor Alexander Charles Crutchley, DSC (Royal Navy)
- Lieutenant Commander Geoffrey Heneage Drummond (Royal Navy Volunteer Reserve)
This was second raid slightly more successful, but it proved impossible to block the seaward exits of the Bruges-Zeebrugge and Bruges-Ostend canals.
The Battle of Cambrai: PDF of the rules is now available
Posted: March 18, 2018 Filed under: Early 20th Century, Wargame Design, World War I 8 Comments
Infantry from the 16th Infantry Division move forward.
The Battle of Cambrai: An Army Level Game for One (or more Players) by Martin Rapier
Posted: March 17, 2018 Filed under: Battle Report, Early 20th Century, Wargame Design, World War I 20 CommentsAn Army Level Game for One (or more Players) by Martin Rapier
1. Introduction
Many, many years ago, in an issue of Airfix magazine (or possibly the Airfix annual) I saw a photo of a World War One game where the author had assembled a number of Airfix Mark 1 tanks that were busily advancing on a reproduction of the German trench system around Hamel modelled out of Plasticene of all things. The tanks were supported by British infantry in caps and the Germans all had pointy helmets, (all that was available then) but it was an image which has stayed in mind ever since, and I thought that, one day, I too would put on a game with masses of rhomboid tanks poised to crash through the mud and the blood to the green fields beyond. That day finally came last year when I realised just how many W.W.1 tanks the redoubtable members of Sheffield Wargames Club had between them. Time for a game …
2. Design Concepts
After reading around the subject, I decided there were a number of elements of the battle I wanted to capture:
- The sheer mass of armoured vehicles employed (almost 500 in all);
- The key tactical role the tanks played in the destruction of German wire obstacles in lieu of a long preliminary bombardment;
- The limited endurance of W.W.1 heavy battle tanks and the limits that posed on their operational significance.
Having decided to put a modicum of complexity into modelling the armoured side of things, then clearly the infantry, artillery etc. were going to have to be heavily abstracted to make a playable game, but these elements needed to be present and have the capability to play a significant role as W.W.1 armoured operations were most definitely a combined arms event. One element I made very abstracted was the creeping barrage, in the end allowing British field guns to fire fairly freely (although only able to hit the first two rows) as it wasn’t worth the extra complexity of specifying barrage or rates of advance etc.
The basic game elements were drawn from my various grid based games (most of which were in turn inspired by Peter Pigs ‘Square Bashing’ and Ian Drury’s ‘Storm of Steel’ and ‘Sands of New Stanhall’. I kicked around some designs for a two or three day battle which would include some of the German counter attacks but in the end decided to concentrate purely on the first day. This in turn meant that all players would play the British, as running the Germans on the wrong end of the initial attack would be a dismal job at best! The game then fell into place fairly rapidly, the mechanisms used in Operation Uranus being obvious candidates, the main things to note being:
- Dice rolls are required to enter particular terrain types, this made wire especially a formidable obstacle to infantry and cavalry.
- Rolling dice for movement meant vehicle reliability could be simply modelled by making low scores a bad result for tanks (losing vehicles to breakdowns etc).
- Whilst infantry, guns and cavalry were modelled as one base = one battalion (or cavalry brigade) and they fought as a single element, the tanks were represented as strength points assigned to each vehicle model so the attritional effects of movement and combat could be modelled without requiring truly immense numbers of toys. The available tank SPs were just distributed over the available tank models and recorded with little dice. The game was designed with twelve tanks in mind, but in the event we managed to assemble no less than eighteen!
- Artillery barrages attack everything in the square, this makes the defending artillery pre-registered on no mans land extremely powerful indeed if the attackers try and march through with massed infantry. This in turn means that reaching the enemy gun line is a high priority for the tanks and that infantry attacks against uncut wire are essentially doomed to fail (as there is very little chance of crossing the wire and the defensive artillery will destroy units stuck in no mans land fairly quickly).
- Similar command and control limits as in Operation Uranus apply i.e. units can generally only move straight forward once committed to combat.
3. Playsheet
A very simple set of rules, British move and then Germans move. Squares are attacked by ‘assaulting’ them i.e. trying to move into them. Those units which make a successful move roll are shot at by the defenders, the survivors then engage in three rounds of close combat. Stationary units are hit by fire on a 6 but moving targets on a 5 or more, which makes assaults extremely bloody. Only some units have a ranged fire capability, the rest fight by assaulting. Move distances and ranges are in terms of squares, orthogonal only.
Turn Sequence
- British move, declare assaults.
- German move, declare assaults.
- Artillery fire.
- Ranged fire.
- Assaults.
- Rally (4+).
Units

- * Dice per SP or base, Number after / is defensive fire only.
- ** 3D6 if Anti-tank gun vs. tanks.
- *** Pillboxes can only be destroyed by hits from artillery or by assault, all other ‘kills’ just disorganise them.
Move rolls (to enter/cross terrain). Use worst type in square.

- * lose 1 SP on a ‘1’.
- Stacking maximum 6 units per square.
Ranged, Artillery and Defensive fire
- 1D6 per unit/SP.
- To hit target: Stationary 6, Moving 5, Moving Cavalry 4.
- Score = killed/1SP loss for tanks.
- Heavy Artillery and barrage fire hits all units in a square.
- Field artillery barrage disorganises if roll one less e.g. 5 disorganised hits on 6 vs. stationary. This is supposed to represent suppression from the creeping barrage.
- Distribute hits randomly. Disorganised units may not move, conduct ranged fire and in assault shoot once and defend with 1 dice with no fortification benefits. Tanks are never disorganised.
- Units may rally on 4+.
Assault
- Units which make a successful move roll enter the square.
- Defender fires twice using assault rating (unless disorganised).
- Then fight three rounds using assault rating, 6 to kill.
- Defender gets one extra dice for wire and one for trenches/cover (not pillboxes).
- Attacker pushes out defender by rolling 6+, adding surplus troop bases, tanks and defenders in fortifications count double.
- Guns and pillboxes are captured if the defender is pushed out, assaulting infantry are disorganised if they win.
4. Game Notes
- 6 x 4 squares battle area, along with a further row of squares for no mans land and another row further back for reserves etc. No mans land is at the top of the battlefield (not shown) with a further line of squares behind that. The Germans have continuous lines of trenches across the first, second and fourth rows, the first two lines being covered by wire as well. The gun line is the third row. Each square represents approximately 2,000m, Cambrai itself is off the table at the bottom of the map.

- The game lasts 8 turns (hours).
- Defensive artillery may be surprised on the first turn if the British choose not to fire a preparatory bombardment. They open fire and are spotted but their fire has no effect on a 3+, roll for each target square.
- The British have four turns of field gun barrage (two shots each) per division and 25 rounds of heavy gun ammo (maximum six shots per turn). One round of preparatory bombardment may be allowed (does not disorganise targets). If the guns move they lose all their dumped ammo and are only allowed one conventional ranged shot per turn. Field guns only support their own division.
- British will need to allocate corps and divisional frontages, which may not overlap for infantry divisions, although a reserve division can overlap one front line division. No movement outside divisional areas. The cavalry boundaries can be allocated when they are committed. Once committed to NO MANS LAND units move straight forward, although tanks may deviate within the Corps zone to avoid obstacles.
German Forces
- 2 x Infantry Divisions with 9 x Infantry, 1 x MG, 1 x Mortar and 3 x Field Guns each
The Hindenburg line has 6 x pillboxes, 3 further pillboxes in outpost and reserve lines. One gun is an Anti-tank gun (positioned in Bourlon Wood).
For each division the commitment of forces to each line is:
- Outpost line: 2 x Infantry, 1 x pillbox.
- Main Battle Line (HKL): 5 x Infantry, 3 x pillbox, 1 x MG, 1 x Mortar.
- Gun line: 3 x gun.
- Reserves: 2 x Infantry.
Only deploy defending units when the British try to enter the square or are adjacent on high ground (Welsh Ridge, Bourlon Ridge).
British Forces
- III Corps
- 62nd Infantry Division (9 x Infantry, 1 x MG, 1 x Mortar).
- 51st (Highland) Infantry Division (9 x Infantry, 1 x MG, 1 x Mortar).
- 20th Infantry Division (9 x Infantry, 1 x MG, 1 x Mortar).
- 12th Infantry Division (9 x Infantry, 1 x MG, 1 x Mortar).
- IV Corps
- 36th Infantry Division (9 x Infantry, 1 x MG, 1 x Mortar).
- 56th Infantry Division (9 x Infantry, 1 x MG, 1 x Mortar).
- Cavalry Corps
- 5th Cavalry Division (3 x Cavalry).
- 2nd Cavalry Division (3 x Cavalry).
- 1st Cavalry Division (3 x Cavalry).
- Tank Corps with 380 Mark IV tanks and 96 support tanks. Approximately 1SP per 6 tanks so around 70 SP distributed over the available models, maybe more if feeling generous.
5. Player Briefings
British Briefing
General Scheme
General Sir Julian Byng’s plan for an offensive by his Army has been accepted by GHQ. We will make a surprise attack in the region of Cambrai using massed tanks supported by predicted artillery fire and no major preliminary bombardment. When a breakthrough has been achieved the Cavalry Corps can exploit the situation and advance on Douai and Valenciennes. Given the limited resources available following our great victory at the Third Battle of Ypres, the progress of the operation will be reviewed after 24 hours.
Objectives
- Break through the Hindenburg Line defences on a frontage of at least 10,000 yards.
- Take the dominating Bourlon Wood/Noyelles position.
- Pass the Cavalry Corps through to capture Cambrai and exploit.
Enemy Forces
The enemy is believed to have some six divisions in the area, but only two manning the immediate defences. It is likely that large enemy reinforcements will arrive after 48 hours, however most enemy units are exhausted after the Battle of Ypres.
The Hindenburg Line consists of the three main defensive belts; an outpost line some 2,000m deep; the main battle zone also some 2,000m deep and fronted by a 14′ wide anti-tank ditch and a further reserve line 6,000m to 8,000m into the enemy position.
Each defensive zone is fronted by major wire entanglements, contains numerous dug in positions and bunkers and is reinforced with concreted machine gun posts (the so-called ‘pill boxes’). The bulk of the enemy troops and fortifications are likely to be concentrated in the main battle zone, with counter attack forces in the third line.
The enemy field artillery is mostly located behind the main battle zone and will lay down a curtain of defensive fire once our attack has commenced. The enemy gun line is out of barrage range of our field artillery, but the heavy artillery is within easy counter battery range.
Friendly Forces
- III Corps
- 62nd Infantry Division
- 51st (Highland) Infantry Division
- 20th Infantry Division
- 12th Infantry Division
- IV Corps
- 36th Infantry Division
- 56th Infantry Division
- Cavalry Corps
- 5th Cavalry Division
- 2nd Cavalry Division
- 1st Cavalry Division
Each division has 100 field guns with sufficient ammunition for four hours barrage fire each. If they move this ammunition will be left behind and they will be reduced to their ready supply.
300 Heavy guns (six brigades) with sufficient ammunition for a total 25 concentrations between them. These guns are immobile.
Tank Corps, three tank brigades with 380 Mark IV heavy battle tanks and a further 96 support tanks of various marks.
Special Order to Tank Commanders
- Tomorrow the Tank Corps will have the chance for which it has been waiting for many months – to operate on good going in the van of the battle.
- All that hard work and ingenuity can achieve has been done in the way of preparation.
- It remains for unit commanders and tank crews to complete the work by judgement and pluck in the battle itself.
- In the light of past experience I leave the good name of the Corps with great confidence in their hands.
- I propose leading the attack in the centre division.
Commanding Tank Corps
Tim Gow, Sharon Langdridge and John Armatys turned up for this one, which worked out at a rather handy two divisions each for them to command. The addition of Tim’s extra tanks (the paint seeming suspiciously wet) meant we could field no less than eighteen Mark IV type tanks in a surprising variety of colour schemes and markings, all very realistic no doubt. This meant each division could be assigned three tank models to produce a nice even distribution across the front, all very historical, and a necessity given the victory conditions of 10,000m wide break through. The 20mm troops were deployed in the south, and the 15mm troops in the north as being further away they naturally looked smaller.
The progress of the game was recorded for posterity by the miracle of digital camera technology, and we managed to record the situation at the start of the game and at the end of each turn. As might be expected, the massed armour rolled over the Germans, although the game was not without its distinctly sticky moments. The photographic evidence reveals rather poignantly the ever diminishing number of operational tanks in the front line and the increasingly ragged progress once the main Hindenburg defences were reached, a couple of pillboxes in the centre proving extremely tough nuts to crack.
Highlights of the game:
- The sheer spectacle of the table groaning under masses and masses of tanks, supported by an impressive number of infantry (some 54 bases of infantry alone, excluding artillery and support weapons).
- The glee with which the assembled tank commanders rolled over the German outpost line
- The consternation when they hit the Hindenburg Line proper!
- A lone German artillery battalion holding Bourlon Wood for hour after hour, fronted by blazing Mark IVs, all very historical.
- The death ride of the 51st Highland Division as they launched wave after wave of infantry assaults across the St Quentin Canal, only to be mowed down a brigade at a time by the defending artillery (who eventually succumbed to massed mortar and Vickers machine gun fire).
- The triumphant march of the Cavalry who trotted through the middle of the raging battle and off to glory without a scratch.
I was very pleased with the way the game went, and the players were all delighted to have given the Hun a good kicking, although it was by no means a walkover – some divisions had lost all their infantry and few tank units had more than one or two SP left. The only thing which really concerned me was that the combination of benefits they got which made the defenders extremely tough indeed and even during the game I dropped the additional dice they were supposed to have in close combat. If running it again I’ll probably revise that area somewhat.
7. Conclusions
Apart from a couple of minor tweaks, this game seems to work well. It is perhaps a bit depressing that I seem to have to write a set of rules for every single game I do, perhaps one day I’ll crack the secret of writing a more general purpose set. I’ll be bringing this to COW2003, and I hope anyone with even a passing interest in W.W.1 can come and give it a go. Contributions of even more tanks will be welcome!
Admiral Sir Lionel Halsey GCMG, GCVO, KCIE, CB, ADC
Posted: September 21, 2017 Filed under: MIscellaneous musings, World War I 6 CommentsLionel Halsey was the fourth son of Sir Thomas Frederick Halsey Bt MP, and very early in his life he decided upon a career in the Royal Navy. After attending Stubbington House School in Fareham, Hampshire (a well-known navy ‘crammer’), he joined HMS Britannia as a Cadet in 1885. He became a Midshipman in 1888, a Sub-Lieutenant, and then a Lieutenant in 1894, having served with the Royal Yacht Squadron from 1893.
His next sea appointment was to HMS Powerful, and in 1897 he sailed in her to the Far East. The ship was supposed to come back to the UK in 1899, but during her return journey the Second Boer War broke out, and she was diverted to South Africa to given what support she could. This took the form of a Naval Brigade, part of which – a battery of 4.7-inch naval guns mounted of extemporised mountings – was commanded by Lieutenant Halsey. His exemplary service marked Lionel out for rapid promotion, and he became a Commander in 1902 when he joined the newly-built cruiser HMS Good Hope. Only three years later he became a Captain, and took over command of HMS Donegal.

In 1912 Captain Lionel Halsey took command of the newly-commissioned battle cruiser HMS New Zealand, and during a cruise to New Zealand to show the flag, Lionel was presented with a Māori piupiu (warrior’s skirt) and hei-tiki (pendant) which he was asked to wear if the ship ever went into battle. He did so, and it is recorded that he wore them on the bridge of his ship at the Battles of Heligoland Bight and Dogger Bank.
By the time of the Battle of Jutland in 1916 Lionel had been promoted and was Admiral Jellicoe’s Captain of the Fleet, serving aboard the flagship, HMS Iron Duke. When Admiral Jellicoe moved to the Admiralty in November 1916 to become First Sea Lord, Lionel went with him and became Fourth Sea Lord. The following year he was promoted to the rank of Rear Admiral and moved to the position of Third Sea Lord. He returned to sea the following year when he took over as Rear Admiral commanding the Second Battle Cruiser Squadron of the Grand Fleet at the same time as becoming the commander of the Australian Fleet. He held these two posts from 1918 to 1920, during which time he received his knighthood.
He retired in 1926 and became an Extra Equerry to the King, King George V. He also took on the role of Comptroller and Treasurer of the Prince of Wales’s household, and when King George died, he moved over to become an Extra Equerry to King Edward VIII. Unfortunately the relationship between the two broke down as the Abdication crisis loomed, and he ceased to perform these duties, only to return as an Extra Equerry to King George V when the latter came to the throne.
He died in 1949, and Arthur Marder (the famous naval historian) wrote of him that he was:
‘one of the most popular Officers of his day – a delightful, outgoing, frank person, a fine leader, a very zealous and competent Officer, who might have gone to the very top after the War but for his acceptance of a Court Appointment.’
It is of interest to note that he was a very, very distant cousin of Admiral William Frederick ‘Bill’ (or ‘Bull’) Halsey USN, who at various stages of the Second World War commanded Carrier Division 2, Task Force 16, the US forces in the South Pacific Area, and the US Third Fleet.
Well that’s one task completed; only a load more to do …
Posted: September 20, 2017 Filed under: Freemasonry, World War I 6 CommentsI have chosen to talk about the Halsey family of Great Gaddesden, Hertfordshire. They held the major offices in Freenasonry in Hertfordshire for a period of over one hundred and fifty year, and many of them had distinguished non-Masonic careers in politics and the armed forces. The latter includes a naval captain who wore a Maori war-skirt on the bridge of his battle cruiser at the Battle of Heligoland Bight and the Battle of Dogger Bank!
They don’t breed them like that anymore … or do they?
Anniversary gift from my wife
Posted: August 7, 2017 Filed under: Book Review, World War I 14 CommentsNow my wife is easy to buy gifts for … especially since she started to collect Pandora jewelry. All I have to do is to look at her online wish list, copy images of what is on the list onto my iPhone, and make a visit to the nearest branch. I then go through the ‘Have you got one of these in stock?’ conversation with the sales assistant as I show her the images … et voila, mission accomplished!
Sue tells me that she does not have as simple a job as I do … but this year she had a brainwave and bought me a book that she knew that I didn’t have (I think that she checked my bookshelves beforehand) … and it is exactly what I would have bought had I seen it.

A HISTORY OF THE FIRST WORLD WAR IN 100 OBJECTS is one of those books that is an ideal bedside companion. As the name suggests, it is split up into one hundred short chapters, each of which describes an object from the First World War and its relevance to the history of the conflict. Some random examples include:
- The pen that signed the Ulster Covenant
- HMS Lance‘s 4-inch gun
- Austrian commemorative ribbons
- Nurse Cavell’s secret diary
- The Soixante-Quinze field gun
- A Simplex trench locomotive
- Augustus Agar’s boat
The book was written by John Hughes-Wilson, with the assistance of Nigel Steel (Imperial War Museum Consultant) and Mark Hawkins-Dady (Editor), and published by Cassell Illustrated and the Imperial War Museum (ISBN 978 1 84403 918 0). It is dedicated to the memory of the late ‘Professor and Brigadier Richard Holmes CBE, TD, scholar, gentleman and soldier, patron and founder of the Guild of Battlefield Guides‘, who was possibly one of the best (if not the best) military historians the UK has had in a generation.
I am going to enjoy reading this book over the coming months … especially because of the personal anniversary that it celebrates.
