Royal Arsenal Museum 2017: Large calibre machine guns
Posted: December 31, 2017 Filed under: Uncategorized 2 CommentsThe first is an example of a M1871 37mm Hotchkiss revolving cannon on land carriage.


This was similar in design to the Gatling Gun, but was designed from the outset to use larger calibre ammunition.
The second is a Maxim Nordenfelt 37mm cannon, better known as a one-pounder ‘pom-pom’ gun. It is on a shipboard or fortification mounting.


This is an early example as unlike this gun, later ones carried Vickers, Sons and Maxim (VSM) maker’s plates.
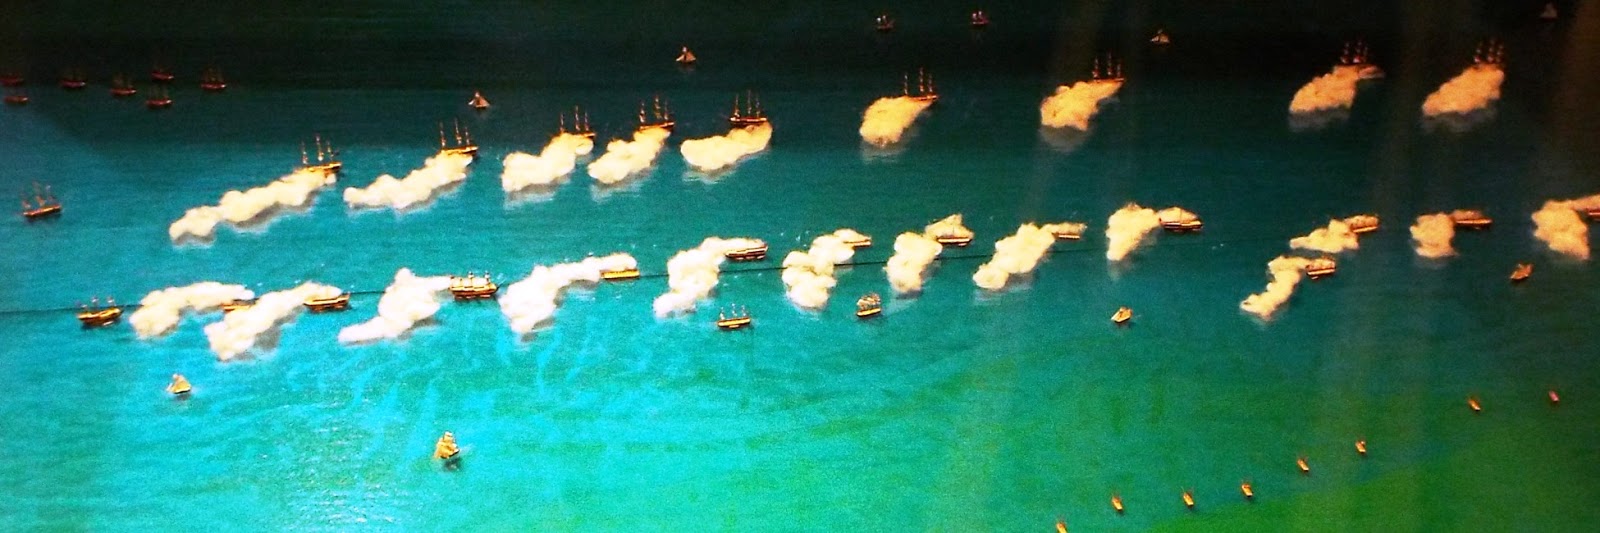
Royal Arsenal Museum 2017: Naval Battle Models
Posted: December 30, 2017 Filed under: Uncategorized 6 Comments


The second shows a much smaller action that occurred when HMS Africa (which was escorting a convoy of merchantmen) came under attack by thirty two oared gunboats on 20th October 1808.


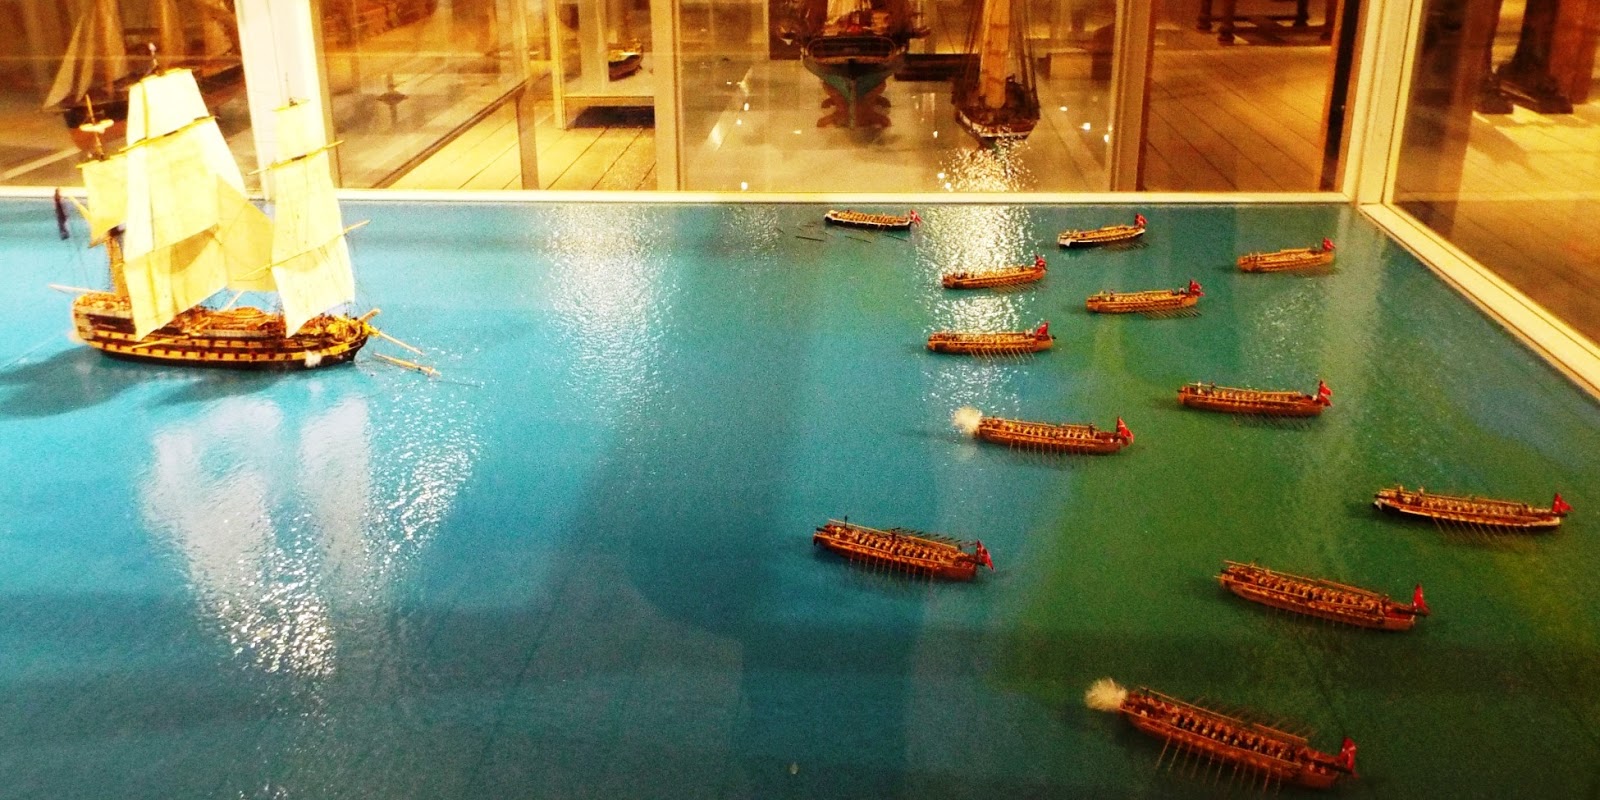
The third and final model depicts the Battle of Copenhagen (2nd April 1801) at its height.


La Ultima Cruzada is now available from Amazon
Posted: December 29, 2017 Filed under: Spanish Civil War, Wargames publications 6 Comments
It is currently listed as ‘Temporarily out of stock‘, but I’ve discovered that this is Amazon-speak for ‘no one has ordered a copy yet‘. Interestingly they are also selling it as ‘post free’ to Amazon Prime customers … but at a slightly higher price (£26.69) than Lulu.com quote without postage and packing (£24.99).
I understand that the Amazon Prime price has now dropped to £24.99 with free postage, although it is still listed as ‘Temporarily out of stock‘.
Doing the write thing
Posted: December 28, 2017 Filed under: MIscellaneous musings 14 CommentsI was recently asked what I did now that I was retired, and on the spur of the moment – and without much thought – I replied ‘I am a writer‘. I then felt obliged to justify that … and discovered to my own surprise that I probably spend more time writing than I do doing almost anything else. I will be looking at just how much I have written in the last year or so when I write a blog review of the last year and my plans for the future, but as I am presently working on a book that I was commissioned to write rather than one that I am writing off my own bat, I thought that I ought to record just how I go about the process.
From what I can gather, all writers have a method or process of writing that is peculiar or particular to them. When George Simenon sat down to write a Maigret story, he had no idea of how the plot would develop; he just let it evolve whilst he wrote. Other writers have a daily routine where they sit somewhere isolated – usually a shed or summerhouse – and write some many thousand words before lunch and then so many more during the afternoon. Some like to have music playing in the background; others like total silence. Some like to be surrounded with displays on which are pinned various pieces of information they will need during the writing process; others like a completely bare desk, devoid of all notes and distractions.
In my case I seem to write best in solitude and silence, surrounded by the reference books and notes that I will need. (As a result, the room that I write in looks like a tip … but I usually know where I can find what I need when I need it!) The research I use would have been put together over weeks, months, or even years because I like to do my research and preparation in detail before I start … and when I am ready, I write … and write … and write. I become totally absorbed in the process and blitz the whole thing.
My most recent book – LA ULTIMA CRUZADA – is both the longest I have written and took me the longest to write. It had been in preparation for years. In fact I had been writing notes and collecting references almost from the day the second edition was published back in the early nineteen nineties. By the time I actually sat down to write it, I had already formed in my head what the book was going to look like when it was complete … and other than the fact that it does not contain the photographs that I wanted to include, but which I could not afford to buy licences for, it looks pretty well how I imagined it would.
Alexander Suvorov is quoted as having said ‘train hard, fight easy’ (or possibly ‘hard training, easy combat’) and in some ways that is the way I go about writing, although my version of the quote would be ‘extensive preparation, easy writing’. Doing the research until I feel totally immersed in it enables me to begin the writing process in my mind before I sit down at my keyboard. When I finally put finger to keyboard, the words seem to flow out faster than I can actually type them, and I often finish the day with many pages written and two aching index fingers! (I have never learned how to touch-type, which is not bad thing as it gives me time to revise what I write as I write it.)
The book I am currently working on – and which I should be writing now if it wasn’t for the need I have to take a break every so often in order to keep my mind ‘fresh’ – is the centenary history of a very large and very important Masonic Lodge. I was asked to write it last year, and the deadline for publication is May 2020. The research has involved me reading many pages of hand-written documents and creating a database of the Lodge’s membership as well as a meeting-by-meeting timeline. At the same time my wife (Sue) has been doing genealogical research into each of the Lodge’s Worshipful Masters, and this now sits in ten ring binders that are stored in boxes in the small room where I write. Just before Christmas we reached the point where our researches could not proceed any further until the last batch of documents is released to us. I therefore decided to begin the process of writing the book with what research we have done to date, in the full knowledge that I will have to revisit it at a later date.
I began writing the book two days ago … and I have already completed nearly forty pages of text. I hope to double or even treble this by the end of the forthcoming weekend, but by setting myself this target it looks as if I won’t be doing much in the wargaming line before the end of 2017. Mind you, that is only three days, so it is doubtful that I will begin to suffer any withdrawal symptoms!
Royal Arsenal Museum 2017: The Danish Army in Afghanistan
Posted: December 27, 2017 Filed under: Uncategorized 10 Comments
… through their arrival at Camp Bastion …


… and then on to their deployment to a forward patrol base.


You have a chance to get some idea of the operational conditions and environment the soldiers had to face (although they are unable to duplicate the very distinctive smell of Afghanistan that soldiers have told me about) …


… and the cost in term of human life and equipment …
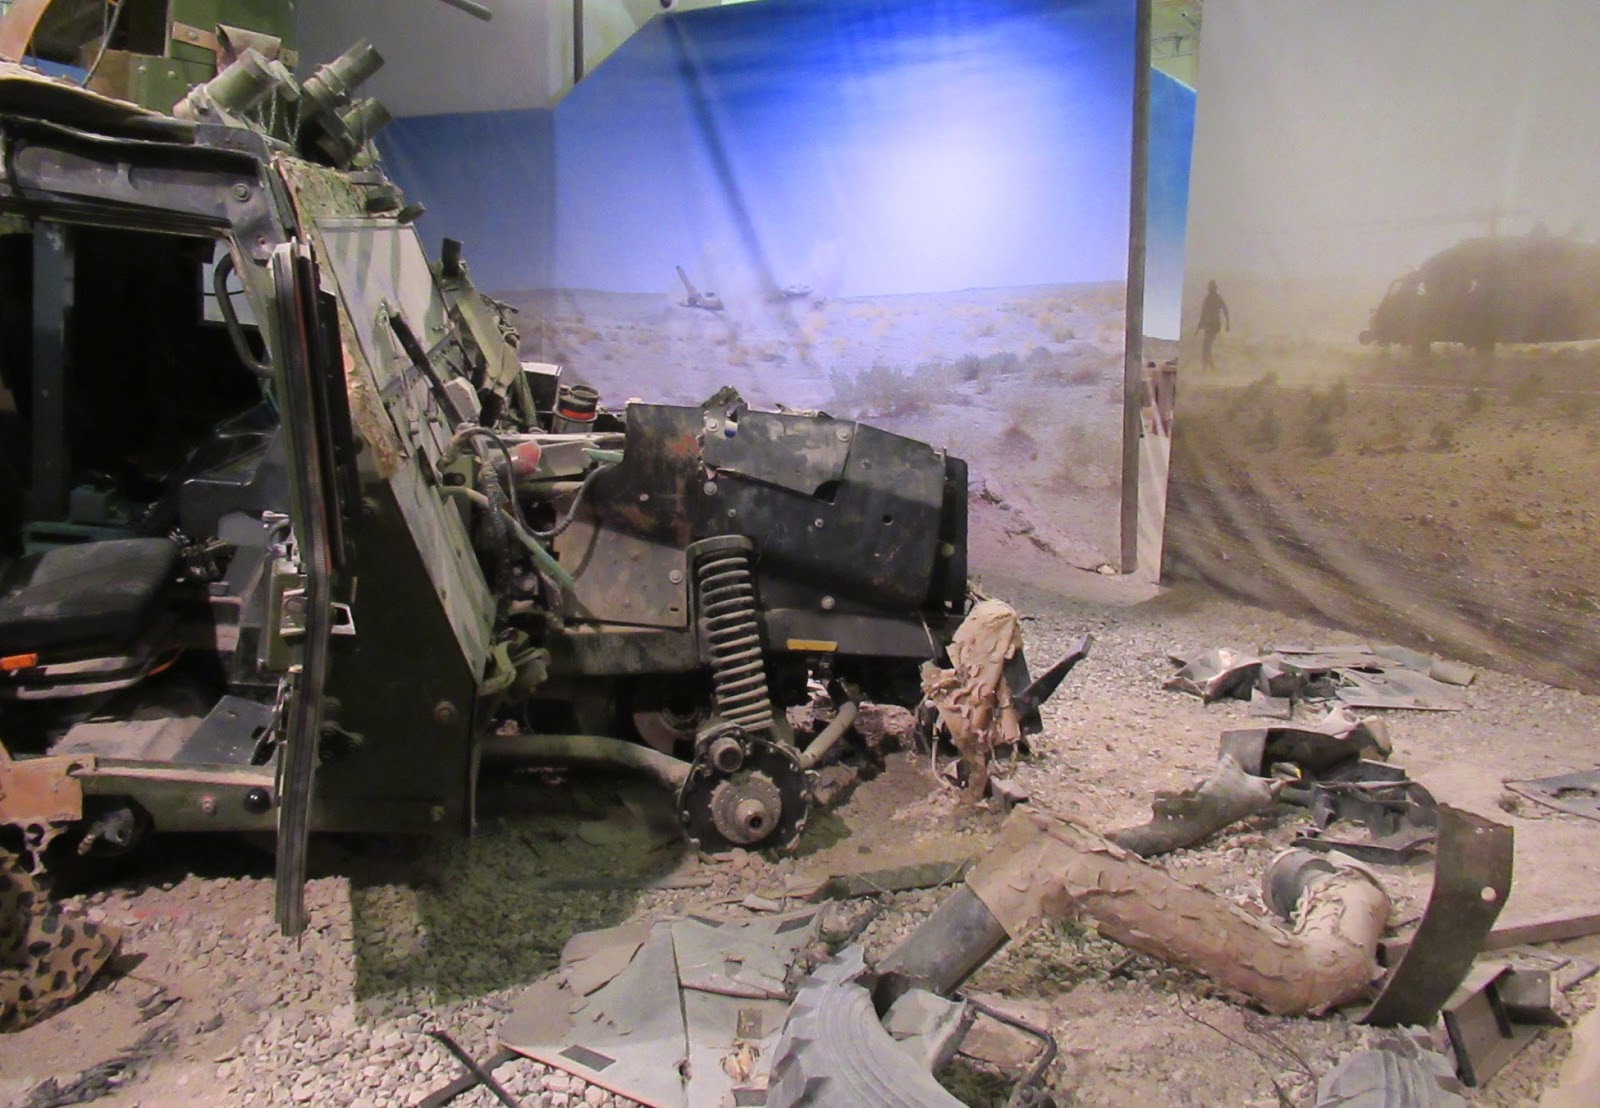


… before they return home to be greeted by their friends and family back in Denmark.

I don’t know if any British military museums have a similar display that depicts the British Army’s recent deployments to Iraq and Afghanistan … but if they don’t, then I think that they ought to.
Royal Arsenal Museum 2017: Dockyard Models
Posted: December 26, 2017 Filed under: Uncategorized 6 Comments


The next two sets of models show the dockyards as they were at the height of Denmark’s naval power during the eighteenth century and early nineteenth century.


The final model shows how the naval dockyard looked towards the end of the twentieth century, and includes some exquisite models of now-scrapped Royal Danish Navy warships.


Merry Christmas!
Posted: December 25, 2017 Filed under: MIscellaneous musings 38 Comments
… and a safe and happy New Year!
The Battle of Königstür
Posted: December 24, 2017 Filed under: Battle Report, Late 19th Century 10 CommentsA Red 4 was turned over. The Austro-Hungarians therefore activated four units plus the commander.
At first light, General Rot sent his two Jäger regiments forward to occupy the hills on either side of Königstür whilst he led his foremost infantry brigade towards the town.

A Red 2 was turned over. The Austro-Hungarians therefore activated two units plus the commander.
Whilst the Jägers continued their advance, General Rot waited somewhat impatiently for the rest of his force to catch up.

Turn 2 (08.00 to 10.00)
A Black 6 was turned over. The Prussians therefore activated six units plus the commander.
Somewhat later than planned, General Schwartz led his 2nd Division forward on the right whilst the 1st Division moved forward on the left.

A Red 2 was turned over. The Austro-Hungarians therefore activated two units plus the commander.
General Rot rode forward into Königstür at the head of one of his infantry regiments whilst the right-hand Jäger regiment moved forward to occupy the centre of the hill.

Turn 3 (10.00 to 12.00)
A Black 5 was turned over. The Prussians therefore activated five units plus the commander.
Seeing that Austro-Hungarian troops were already occupying both hills, General Schwartz began to deploy his troops accordingly. The 2nd Division’s leading elements shook themselves out of column and into line, with the artillery regiment in the centre. At the same time the Prussian Jägers began to move out towards the right flank in order to outflank to Austro-Hungarian forces on the hill.
The 1st Division also began to deploy for an attack on the hill to its front, but somewhat tardily than the 2nd Division.

A Black 7 was turned over. The Prussians therefore activated seven units plus the commander.
General Schwartz used the opportunity to both deploy the leading brigade of the 1st Division so that it could assault the left-hand hill and to bring forward the rest of his force. He also moved the Jägers forward to the bottom of the right-hand hill.

Turn 4 (12.00 to 14.00)
A Black 5 was turned over. The Prussians therefore activated five units plus the commander.
General Schwartz ordered his artillery to open fire on the enemy troops on the hills.
The left-hand Prussian artillery regiment threw a 4, to which was added its Combat Power (3), resulting in a modified score of 7. In reply the Austro-Hungarian Jägers threw a 1, to which was added its Combat Power (4), resulting in a modified score of 5. Because the defending unit’s modified score was less than the attacking unit’s modified score but more than half the attacking unit’s modified score, the defending unit’s Combat Power was reduced by 1.

The right-hand Prussian artillery regiment threw a 6, to which was added its Combat Power (3), resulting in a modified score of 9*. In reply the Austro-Hungarian Jägers threw a 5, to which was added its Combat Power (4), resulting in a modified score of 9. Because the defending unit’s modified score and the attacking unit’s modified score were equal, the artillery fire was ineffective.
The Prussian Jägers then moved forward so that they could engage the Austro-Hungarian Jägers as soon as such an action became possible.

In the centre, two Prussian infantry regiments advance in column towards Königstür.

A Red 3 was turned over. The Austro-Hungarians therefore activated three units plus the commander.
Whilst General Rot hurried the leading infantry brigade forward into Königstür to counter the developing Prussian advance on the town …

… the left-hand Austro-Hungarian Jäger regiment engaged the Prussian Jägers . It threw a 2, to which was added its Combat Power (3), resulting in a modified score of 5. In reply the Prussian Jägers threw a 3, to which was added its Combat Power (4), resulting in a modified score of 7. Because the attacking unit’s modified score was less than the defending unit’s modified score, the fighting was inconclusive.

Turn 5 (14.00 to 16.00)
A Red 3 was turned over. The Austro-Hungarians therefore activated three units plus the commander.
General Rot moved back into Königstür and was finally able to bring forward the rest of his force.

A Black 5 was turned over. The Prussians therefore activated five units plus the commander.
General Schwartz ordered his artillery to continue firing on the enemy troops on the hills.
The left-hand Prussian artillery regiment threw a 5, to which was added its Combat Power (3), resulting in a modified score of 8. In reply the Austro-Hungarian Jägers threw a 2, to which was added its Combat Power (3), resulting in a modified score of 5. Because the defending unit’s modified score was less than the attacking unit’s modified score but more than half the attacking unit’s modified score, the defending unit’s Combat Power was reduced by 1.

The right-hand Prussian artillery regiment threw a 2, to which was added its Combat Power (3) and the commander’s Combat Power (2), resulting in a modified score of 7. In reply the Austro-Hungarian Jägers threw a 2, to which was added its Combat Power (3), resulting in a modified score of 5. Because the defending unit’s modified score was less than the attacking unit’s modified score but more than half the attacking unit’s modified score, the defending unit’s Combat Power was reduced by 1. (Note: The artillery was able to fire at the Austro-Hungarian Jägers because their line-of-sight was not obscured by the Prussian Jägers regiment.)

Prussian Jäger regiment engaged the Austro-Hungarian Jägers. It threw a 4, to which was added its Combat Power (4), resulting in a modified score of 8. In reply the Austro-Hungarian Jägers threw a 1, to which was added its Combat Power (2), resulting in a modified score of 3. Because the defending unit’s modified score was less than half the attacking unit’s modified score, the defending unit’s Combat Power was reduced by 2. (Note: The Austro-Hungarian Jäger regiment’s Combat Power was now 0, but it was not removed from the battlefield. This would only happen if it suffered any further loss of Combat Power.)

General Schwartz also ordered two of the 1st Division’s infantry regiments to edge forward in order to threaten the Austro-Hungarian Jäger regiment on the left-hand hill.

Turn 6 (16.00 to 18.00)
A Black 7 was turned over. The Prussians therefore activated seven units plus the commander.
General Schwartz ordered the 1st Division’s artillery to continue firing on the enemy troops on the hill in front of it.
The left-hand Prussian artillery regiment threw a 1, to which was added its Combat Power (3), resulting in a modified score of 4. In reply the Austro-Hungarian Jägers threw a 2, to which was added its Combat Power (2), resulting in a modified score of 4. Because the defending unit’s modified score and the attacking unit’s modified score were equal, the artillery fire was ineffective.

General Schwartz then ordered the 2nd Division’s artillery to fire at the enemy troops in the nearest part of Königstür.
The right-hand Prussian artillery regiment threw a 6, to which was added its Combat Power (3) and the commander’s Combat Power (2), less 2 because the enemy unit is inside a built-up area, resulting in a modified score of 9. In reply the Austro-Hungarian infantry regiment threw a 1, to which was added its Combat Power (3), the commander’s Combat Power (1), resulting in a modified score of 5. Because the defending unit’s modified score was less than the attacking unit’s modified score but more than half the attacking unit’s modified score, the defending unit’s Combat Power was reduced by 1.

The Prussian Jägers attacked the much-depleted Austro-Hungarian Jäger regiment on the right-hand hill … and the survivors of the Austro-Hungarian unit surrendered.

One of the 1st Division’s infantry regiments now climbed the left-hand hill and attacked the Austro-Hungarian Jäger regiment. The Prussian infantry regiment threw a 4, to which it added its Combat Power (3), resulting in a modified score of 7. In reply the Austro-Hungarian Jäger regiment threw a 3, to which was added its Combat Power (2), resulting in a modified score of 5. Because the defending unit’s modified score was less than the attacking unit’s modified score but more than half the attacking unit’s modified score, the defending unit’s Combat Power was reduced by 1.

A second 1st Division infantry regiment advanced to the bottom of the left-hand hill and attacked the Austro-Hungarian Jäger regiment. The Prussian infantry regiment threw a 3, to which it added its Combat Power (3) less 1 because the enemy unit is uphill, resulting in a modified score of 5. In reply the Austro-Hungarian Jäger regiment threw a 2, to which was added its Combat Power (1), resulting in a modified score of 3. Because the defending unit’s modified score was less than the attacking unit’s modified score but more than half the attacking unit’s modified score, the defending unit’s Combat Power was reduced by 1 to 0.

Sensing that the battle was beginning to go his way, General Schwartz ordered two of the 2nd Division’s infantry regiments forward towards the right-hand hill.

A Red 4 was turned over. The Austro-Hungarians therefore activated four units plus the commander.
Leaving the remaining Jäger regiment to delay the Prussian advance, General Rot ordered his remaining infantry regiments to withdraw.

Turn 7 (18.00 to 20.00)
A Black 7 was turned over. The Prussians therefore activated seven units plus the commander.
As reports reached him that indicated that the Austro-Hungarians were withdrawing, General Schwartz ordered a general advance.
On the left the remaining Austro-Hungarian Jäger regiment surrendered …

… whilst in the centre …

… and on the right, the Prussians cautiously advanced.

A Red 2 was turned over. The Austro-Hungarians therefore activated two units plus the commander.
The Prussians were right to be cautious. General Rot might not have been the most gifted Austro-Hungarian commander, but he was certainly brave. He ordered his artillery regiment into action, and they engaged the nearest Prussian infantry regiment. They threw a 6, to which was added its Combat Power (3) and the commander’s Combat Power (1), resulting in a modified score of 10. In reply the Prussian infantry regiment threw a 1, to which was added its Combat Power (3), resulting in a modified score of 4. Because the defending unit’s modified score was less than half the attacking unit’s modified score, the defending unit’s Combat Power was reduced by 2.

General Rot then withdrew one of his remaining infantry regiments whilst he remained behind in Königstür to ensure that the retreat was carried out in an orderly fashion.

Turn 8 (20.00 to 22.00)
A Red 4 was turned over. The Austro-Hungarians therefore activated two units plus the commander.
A night fell, General Rot was able to withdraw his remaining troops, leaving the Prussians to occupy Königstür … but not that night!
A Red 3 was turned over … which meant that General Schwartz was unable to move his troops into the town, and they ended the day bivouacking where they ended that day’s battle.
The length of the ‘day’ was eight two-hour turns, with each turn being split into two segments.
* It was not until after the artillery had fired and the result had been adjudicated that I realised that I had not added the adjacent Prussian commander’s Combat Power into the calculation. Had I done so the Austro-Hungarian Jägers would have reduced their Combat Power by 1. I made this change to their Combat Power as soon as I had realised my error.
From my point-of-view this was a very satisfactory solo play-test.
The card activation system ensured that neither side could be sure that they would be able to do everything they wanted to do when they wanted to do it. It also reflected the differences in abilities between General Rot (a ‘Poor’ general) and General Schwartz (an ‘Average’ general). The former did the best he could within the limits of his abilities whereas the latter never quite seemed to be able to exploit the opportunities that arose. The fact that the Austro-Hungarians were able to hold up the Prussian advance for a day is testament to this.
Limiting the supply of artillery ammunition did not have an impact on the outcome I had expected, but I was very conscious of the fact that neither side could use their artillery to batter the enemy into submission before sending in their infantry to mop up.
The combat system seemed to work better in this play-test than I had expected it would, and I felt that the outcomes were generally realistic.
All-in-all I finished the play-test with the feeling that these rules will be worth developing further as and when time permits … and fighting this battle was a great way to spend some pre-Christmas downtime!
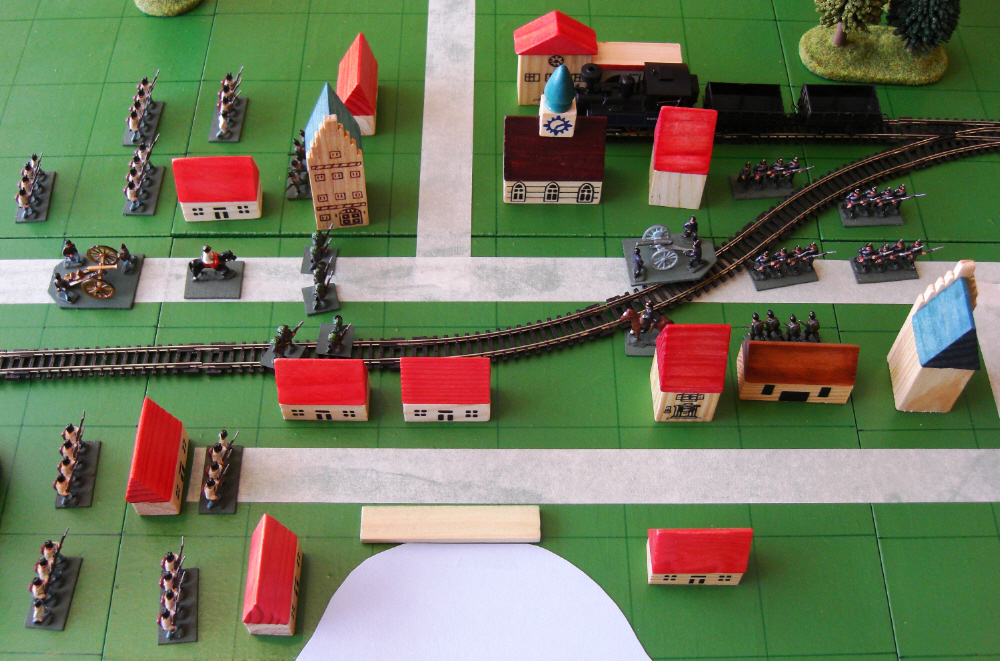
The Battle of Königstür: The scenario, the terrain, the starting positions, and the values of the playing cards in the pack of unit activation cards
Posted: December 23, 2017 Filed under: Battle Report, Late 19th Century 12 CommentsA Prussian Korps had been sent to seize the town of Königstür, a small town at the northern end of a valley to the north of Vienna. By taking control of the town – and thus the valley as well – the Prussians would be able to quickly advance and capture the Austro-Hungarian capital.
The Korps comprised two infantry divisions, each of which had four infantry regiments and an artillery regiment. In addition, the Korps commander – General Schwartz, who was regarded by his superiors as being a very competent but not outstanding officer – had a regiment of elite Jäger at his disposal.
The Austro-Hungarian High Command was well aware of the threat posed by the possible capture of Königstür, and had sent a strengthened infantry division – led by General Rot, who the High Command considered to be one of their less gifted officers – to occupy the town and the surrounding area, and prevent the towns capture.
The enhanced division comprised four infantry regiments, an artillery regiment, and two regiments of elite Jägers.
All artillery units started with enough ammunition to fire six times. Once their ammunition is expended, they would have to be re-supplied … but that would take some time.
The Terrain:
The battlefield viewed from the north (i.e. from the direction of the Prussian advance).

The battlefield viewed from the east.

The battlefield viewed from the south (i.e. from the direction of the Austro-Hungarian advance).

A map of the battlefield viewed from the north.

Starting positions:
The Prussian and Austro-Hungarian forces entered the battlefield as follows:
- The Prussians arrived on the battlefield in two separate divisional columns; the 1st Division at C8 and the 2nd Division (accompanied by the Korps commander and the Jägers) at G8.
- The Austro-Hungarians arrived on the battlefield at D1.
Command ability and the value of playing cards in the pack of unit activation cards:
The two commanders were graded as to their individual command ability, and this determined the value of the playing cards they had in the pack of unit activation cards.
General Schwartz was rated as ‘Average’ and commanded eleven units. 11 ÷ 2 = 5.5, which when rounded up equalled 6. He was therefore allocated black playing cards to the value of five, six, and seven.
General Rot was rated as ‘Poor’ and commanded seven units. (7 ÷ 2) – 1 = 2.5, which when rounded up equalled 3. He was therefore allocated red playing cards to the value of two, three, and four.
When several different things seem to come together …
Posted: December 22, 2017 Filed under: Late 19th Century, The Portable Wargame, Wargame Design 12 Comments
… and just after Sue and I got back to the UK, it struck me that I really ought to give some thought to writing a set of operational-level rules for the mid to late nineteenth century.
At present the rules are very much a work-in-progress, but the design decisions I have made so far are:
- A base will represent a regiment-sized unit or a Commander
- Regiment-sized units will be organised into brigades, divisions, and possibly corps
- Units will have a basic Combat Power based upon its level of training and/or equipment:
- Poor quality Infantry & Cavalry = 1
- Conscript quality Infantry & Cavalry = 2
- Regular quality Infantry & Cavalry = 3
- Elite Infantry = 4
- Artillery = 3
- Command = Varying with quality of the Commander (Range of Combat Power from 1 [Poor] to 4 [Exceptional])
- A card activation system will be used
- Artillery will fire first every turn as per my PORTABLE WARGAME rules … but possibly subject to ammunition supply rules
- Movement distances:
- Artillery that has fired = No movement
- Infantry that is going to fire = 1 hex
- Infantry & Artillery not firing = 2 hexes
- Cavalry & Commanders = 3 hexes
- Weapon ranges are:
- Infantry & Cavalry = Adjacent hex
- Field Artillery = 4 hexes
- Combat Resolution will be as per my OPERATIONAL ART rules (i.e. Both sides compare their D6 dice score + unit Combat Power + transient effects)
- If the attacking unit’s Combat Power is lower than the defending unit’s Combat Power, the combat has been ineffective.
- If the attacking unit’s and defending unit’s Combat Powers are equal, each unit throws a D6 and the unit with the lowest score stays in its current position and reduces its Combat Power by one.
- If the defending unit’s Combat Power is less than the attacking unit’s Combat Power but more than half of the attacking unit’s Combat Power, the defending unit stays in its current position and reduces its Combat Power by one.
- If the defending unit’s Combat Power is less than half of the attacking unit’s Combat Power, but more than a quarter of the attacking unit’s Combat Power, the defending unit reduces its Combat Power by two.
- If the defending unit’s Combat Power is less than a quarter of the attacking unit’s Combat Power, the defending unit reduces its Combat Power by two and withdraws until it is at least one hex away from an enemy unit.
- Transient effects are:
- The unit’s Commander is in the same or an adjacent hex = Add the Commander’s Combat Power
- If the attacking unit is Artillery firing at an enemy unit in an adjacent hex = Add one
- If the attacking unit is attacking an enemy unit in the flank or rear = Add three
- If the attacking unit is attacking an enemy unit that is in defence works, inside a wood, or inside a built-up are = Subtract two
I hope to give these outline rules a try-out sometime soon, possible using figures from my 15mm-scale Peter Laing Austro-Prussian War collection. (I don’t have any Franco-Prussian War figures, so I will have to make do with what I have available.)
Some of my 15mm-scale Peter Laing Austro-Prussian figures in action …
… back in January 2009 when they stood in for the forces of Laurania and Maldacia!
