A (not much) progress report
Posted: January 31, 2012 Filed under: MIscellaneous musings 2 CommentsFor example, one women had had her wallet stolen, in which were all her debit and credit cards as well as her Driving Licence; she had been told to go to the bank to apply for replacements for the cancelled cards … but the bank would not process her request as she did not have any form of identity to prove she was who she said she was. The cashier had to try to deal with this without any help from any other members of staff, all of whom seemed to be sitting at their desks behind the glass partition not seeing the increasing numbers of customers waiting impatiently to be dealt with.
Coming home I got stuck in a minor traffic jam caused by a set of temporary traffic lights that had stopped working properly. They were supposed to control the traffic contra flow around some extensive roadworks, but somehow they had ended up directing both streams of traffic through at the same time, which meant that no one ended up going anywhere. The crew doing the roadworks seemed totally unaware that there was a problem … and the final straw was the arrival on the scene of an emergency ambulance trying to get through the chaos with its ‘blues and twos’ on!
I finally managed to get home just in time to have some lunch, and feeling like my morning had been totally wasted. I hope that this afternoon will be a bit more productive.
Going off at a tangent
Posted: January 31, 2012 Filed under: Memoir of Battle at Sea, MIscellaneous musings 18 CommentsThe answer is very simple. Too many times … and last night was one of them!
There I was, building the hull for my latest model ship, when the idea sprang into my head that I could build model ships that I could use to fight naval battles using David Crook’s version of MEMOIR OF BATTLE AT SEA (MOBAS) and that would look ‘right’ alongside my 15mm-scale* wargames figures. This thought then seemed to preoccupy me for the rest of the evening … and part of the night … until, in that stage just before one drifts off into sleep, I realised what I wanted the models to look like … the battleship playing-piece from MONOPOLY!
My family used to own a very old MONOPOLY set, and it had a small metal battleship as one of the playing-pieces. As I child I wondered whether, if one were rich enough, one could buy enough MONOPOLY sets to field a small fleet of ships to fight battles with. (Ah! The innocence of youth!) This morning I trawled through the Internet and found a picture of one of those old battleship playing-pieces … and it is exactly the sort of design I am looking to recreate.

It is not a perfect scale model of a battleship. It is a cartoon … but it has the ‘look’ I want to achieve. The problem is that I am a good way through making a model ship to illustrate a ‘How to …’ blog entry … so what should I do?
Again, the answer is simple. Do both … and that is what I am going to try to do over the next couple of days … real life permitting!
* I know that there is not such ‘scale’ as 15mm. It refers to the notional height of the figure, but it is my ‘shorthand’ for that scale of wargames figure (1:100th-scale), and it is an expression that most wargamers understand even if it is not correct.
Another progress report
Posted: January 30, 2012 Filed under: Memoir of Battle at Sea, MIscellaneous musings, Modelling, Naval Wargames 2 CommentsThe process of making the models, taking photographs, and describing what I have done at each stage of the construction of the model takes a lot longer than I expected. I had hoped to have finished it today, but it looks more than likely that it will take until tomorrow or possibly even Wednesday.
In the meantime I have been working on one or two ideas for model ships that might work with both 15mm figures and David Crook’s version of MEMOIR OF BATTLE AT SEA (MOBAS). I think that it is not an insuperable problem, but that it might require a bit of ingenuity on my part.
How to build a model Steam River/Coastal Gunboat and model Steam River/Coastal Passenger Ship from scratch
Posted: January 29, 2012 Filed under: 'How to', Modelling 20 Comments1. Making the hull from laminated layers of Plasticard
The first stage is to cut a piece of Plasticard to the size required.

In this instance I wanted the hull to fit into a Hexon II hex, so it is cut to be 4.0″/10.0cm x 2.0″/5.0cm from 0.080″/2.0mm thick Plasticard.
The next stage is to trim the oblong of Plasticard into the shape of the ship’s outline. This outline is marked on the oblong in pencil and then the sections of unwanted Plasticard are carefully cut off.

N.B. I use a Stanley knife/box cutter with a sharp blade to do the cutting, and it is done on a special non-slip rubber modelling mat. A ruler with a non-slip surface is used to cut any straight edges. I strongly recommend that anyone following this method use similar tools at all times when cutting the Plasticard as it will make the whole process much safer and more accurate.
The basic outline is then sanded so that any edges are rounded off.

A second oblong of Plasticard is then cut out. This should be slightly larger than the original oblong as this will make the laminating process easier.

The original ship outline is then glued to the second oblong, and the two are weighted down in order to ensure that the fit is airtight and any surplus glue is squashed out.
N.B. I use liquid cement to glue the two pieces of Plasticard together. This does produce fumes when it is being used and can irritate the nose and throat if the gluing is not done in a well ventilated room. It is absolutely vital that any safety instructions are followed and obeyed.
Because I want the bond between the two pieces of Plasticard to be as strong as possible, I usually leave them under the weights for five to six hours at least (overnight is even better). I then carefully cut around the existing hull shape with my modelling knife, using the edge of the shape to guide my knife. I do not try to cut through the Plasticard at one go (it is far too thick to do that with accuracy), but run the knife slowly around the shape anything up to twenty times, doing a short section at a time. This takes some time to do, but by allowing the weight of the knife to do the work rather than using too much pressure to get the job done quickly, it is possible to do the whole task accurately. This is one of the reasons why I use a Stanley knife/box cutter with a sharp blade to do the cutting and not a modelling scalpel, which has no weight to it and which requires additional hand pressure to make the cut.
Once this is completed I have a thin hull shape that is made from two laminated thicknesses of Plasticard. In this case it is 0.160″/4.0mm thick. Because I want the hull to be somewhat thicker, I repeat the process of cutting out another oblong of Plasticard, gluing the hull shape to it, leaving it under weights for the glue to take affect, and carefully cutting around the shape.

I then end up with a hull shape that is 0.240″/6.0mm thick.

I could continue adding additional layers of Plasticard to make the hull even thicker, but in this case I think that it is thick enough for the model I am making.
The hull shape is then sanded so that any edges are rounded off. I also use a method that is akin to planing to remove excess Plasticard. The blade of the knife is held so that it is almost vertical to the side of the hull shape, and then it is gently scraped along the edge. This takes off a very thin shaving of Plasticard. This method does require practise, and must be done carefully so that the user does not cut oneself, hence the advice to gently rather than vigorously scrape.
2. Making the superstructure
This is by far the easiest part of the modelling process, although care is still required. As the superstructure is made from a series of different-sized boxes, the most important thing (other than using the tools safely!) is to ensure that the corners of the boxes are square when they are assembled.
In this instance the superstructure is made from two ‘boxes’, one large (the main part of the superstructure) and one small (the ship’s bridge. I try to make the boxes in the following manner.
Cut strips of Plasticard (in this instance it is cut from 0.060″/1.5mm Plasticard) that are long enough to form the ‘walls’ of the box. Drill or cut any openings that are required. In this case a number of portholes were drilled into the Plasticard using a simple hand drill from a very cheap set of screwdrivers.

Glue the corners of one long side and one short side of the box together carefully. I use liquid cement that is brushed on to the join (see safety warning above) and the joint is supported whist the glue dries to ensure that the joint is square. I then repeat the process for the other long and short side. The glue takes seconds to dry, but I let it cure for thirty minutes before gluing the two pieces together to form the ‘walls’ of the box.

The ‘lid’ of the box can then be cut and glued in place and gently weighed down whilst the glue cures.

In this instance the ‘lid’ (which will form the upper deck of the ship) has been cut so that it overlaps the sides of the box so that when it is glued to the deck it gives the appearance of a covered way around the deck.

The same method is used to build the ship’s bridge.

The main part of the superstructure is then glued to the deck …

… and once the glue is dry the bridge is glued to the main part of the superstructure.

All the model now requires is a funnel, and this is cut from a length of Plasticard tubing and glued in place.

The basic ship model is now complete, and it can be embellished with additional bits and pieces to taste before being painted.
3. Embellishments and additions
Because these models are to be used in wargames, any embellishments and additions to the models must be robust enough to stand the sort of handling they will get. Things that can be added without too much difficulty are doors and hatches. These are made from suitably-sized pieces of thin Plasticard (e.g. 0.040″/1.0mm thick Plasticard).
One of the most obvious embellishments that can be added are one or two cowl ventilators. These were often seen on steam ships, and allowed fresh air to be drawn below decks.
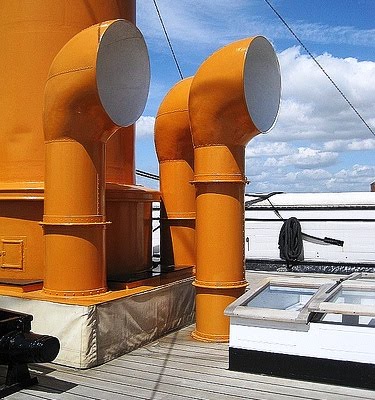
Whilst these are not an essential embellishment for a model, they add period ‘feel’. I had several suitable cowl ventilators in my ‘spares’ box and decided to use some of them.
Winches (such as those used for hauling up anchors) can also be added to the foredeck of model ships. Again, whilst these are not essential, they can add a little aesthetic detail which should not impeded the use of the model in a wargame.


4. Building a River/Coastal Gunboat
The method outlined above can be used to build a River/Coastal Gunboat. These were sometimes converted from River/Coastal Steam Passenger Ships, in which case all that would be needed would be to add a gun or two to the model. Some were built from scratch, and these tended to have smaller superstructures that were optimised to give the ship’s armament the best arcs-of-fire possible.
The model that I have built represents a specially built River/Coastal Gunboat. It was constructed using the same procedures as outlined above and a scratch-built gun was added to the open deck area. The bridge does not have conventional windows. It has a slit through which the ship would be conned. River/Coastal Gunboats often operated close to shore and their bridges had to be protected from small arms fire.


The breakwater fitted just in front of the gun was made from one of the mudguards from an Airfix German Armoured Car kit. I found it my ‘spares’ box and thought that it would improve the ‘look’ of the Gunboat, especially as many of them were fitted with an armoured redoubt or splinter protection around their armament to protect the gun crew.
Progress report
Posted: January 28, 2012 Filed under: MIscellaneous musings Leave a commentBack from paradise … and sat at my modelling table!
Posted: January 27, 2012 Filed under: MIscellaneous musings, Modelling 2 CommentsWe finally got home just after dark, and after a bit of a rest (and a much needed Diet Coke) I began the process of building a couple of model ships using one of the two methods I usually use. I am photographing each stage of the process and intend to use them as the basis of a ‘How to …’ blog entry.
The method I am using involves laminating Plasticard to create solid hulls, and I use this method when I want to make models where the freeboard (i.e. the distance above the waterline) is quite small. As the two models I am making are going to be a River/Coastal Gunboat and a River/Coastal Passenger Steamer, this method was the obvious choice.
The following photograph is a picture of a model River Gunboat I made using a laminated Plasticard hull. Whilst it is not the prettiest model in the world (and not one of my best efforts) it does show what can be achieved using bits and pieces from the spares box.

(Some time ago I needed a model River Gunboat for a game … and did not have one … so I made this one very quickly from what I had in my spares box. The laminated hull had been made for another project that came to nothing, the gun was left over from an Airfix StuG III conversion, the bridge was from a model tug whose hull had been converted into a 20mm-scale Flatiron Gunboat, and the funnel came from an Airfix ‘Great Western‘. It took me less than half an hour to put the pieces together, and it was painted an on the tabletop within an hour. Bearing in mind how quickly it was built, I think that we can forgive its somewhat odd and unique ‘look’!)
The other method I use comes into its own when I want to build a model ship with a higher freeboard (e.g. like the models featured in my recent blog entry) and this second method is completely different from the first. In this case the hull of the model is basically a box with curved sides, and I use the inherent flexibility of the Plasticard to form the curves, although I sometimes resort to using simple formers and boiling water to help make them. This is possible because Plasticard is a thermoplastic that can be formed into a shape using heat, and if it is kept in that shape until the plastic cools, its does not revert to its original shape.
Another day in paradise …
Posted: January 27, 2012 Filed under: MIscellaneous musings Leave a comment
Most of my day can be summed up in the following little ditty (which can be sung to the chorus of ‘Off To Dublin In The Green’).
And we’re off to Herne Bay in the car, in the car
Where the house clear just has to be done
Where no cars are flash and there’s not much cash
For the O-APs waiting for the sun.
Note: O-APs are Old Age Pensioners, who seem to make up a large proportion of the population of this Kent seaside town.
Perhaps I might get some modelling done when I get back. Who knows?
Nugget 250
Posted: January 26, 2012 Filed under: The Nugget, Wargame Developments, Wargames publications Leave a comment
I have uploaded the PDF versions of THE NUGGET and THE NUGGET COLOUR SUPPLEMENT to the Wargame Developments website, and they are now available for members of Wargame Developments to read online or to download and print.

This is the fourth THE NUGGET of the subscription year and if you have not already resubscribed, you can do so by post (please make cheques payable to WARGAME DEVELOPMENTS) or via the PayPal button on the Wargame Developments website.
Income Tax … it’s a wonderful way to ruin your day!
Posted: January 26, 2012 Filed under: MIscellaneous musings 16 CommentsOne of the envelopes was a large A5 brown one, with the words ‘H M Revenue & Customs’ on the front. I opened it to find that it contained my PAYE (Pay As You Earn) Tax Code for the forthcoming year … and that my personal tax allowance (i.e. how much I can earn before I begin to pay Income Tax) had been reduced from £8105 to £1399! This would have meant that I had to pay an extra £112 per month in Income Tax next year.
I immediately contacted the HM Revenue & Customs Helpline … only to hear a recorded message that told me they were too busy to answer my phone call and requesting me to call back later. Undismayed I kept phoning until I finally got into the queue … which I then stayed in for over 45 minutes. When I eventually spoke to a tax adviser he told me that the reason for the reduction of £6706 in my tax allowance was due to an estimation by HM Revenue & Customs that I would need to pay the higher tax rate for some of my income during the forthcoming year.
I went through the figures on my self-assessment tax form for 2010-11 (the year they have based the estimation on) and the tax adviser agreed that I had not needed to pay the higher rate tax during that year. We then went through my estimated earnings for 2011-12 (which was less than I earned in 2010-11), and he agreed that there was no danger of me needing to pay Income Tax at the higher rate during 2011-12. He went through my file, and after some thought agreed that the tax code I had been sent was wrong and that I new one would be sent to me during the next week of so.
All of the above took me nearly two and a half hours … and by the time I had finished I was in no mood to do any modelling. As the title of this blog entry states, ‘Income Tax … it’s a wonderful way to ruin your day!‘
PS. The tax adviser did explain how HM Revenue & Customs made their estimations of future earnings. Apparently they estimate that people paying tax will have a 3% year-on-year rise in income, regardless of the current economic situation. They obviously know something that the rest of us don’t know!
Ship models that will work with Hexon II terrain
Posted: January 25, 2012 Filed under: Memoir of Battle, MIscellaneous musings, Modelling 10 CommentsThe first eight were made from Fimo™, and several were featured in the photographs of my recent MEMOIR OF BATTLE (MOB) play-test.
Flatiron Armoured Gunboat: 4.5″ x 2″ (11cm x 5cm)

Armoured Gunboat: 3.75″ x 1.75″ (9.5cm x 4.5cm)

Light Cruiser: 5.75″ x 1.75″ (14cm x 4.5cm)

Coastal/River Passenger Steamer (1): 4″ x 2″ (10cm x 5cm)

Coastal/River Passenger Steamer (2): 4″ x 2″ (10cm x 5cm)

Sailing Craft (1): 3.75″ x 2″ (9.5cm x 5cm)

Sailing Craft (2): 4″ x 2″ (10cm x 5cm)

Sailing Craft (3): 3.5″ x 1.75″ (9cm x 4.5cm)

The next four were made from Plasticard and are as yet unpainted.
Gunboat: 6″ x 2″ (15cm x 5cm)

Cruiser: 8″ x 2.5″ (21cm x 6cm)

Ironclad Battleship (1): 10.25″ x 3″ (26cm x 7.5cm)

Ironclad battleship (2): 10.25″ x 3″ (26cm x 7.5cm)

What this comparison shows is that although the Plasticard ships are much more accurate (if somewhat distorted) models, they are just too large to represent the sort of ship they are when used with the Hexon II terrain. I have therefore come to the conclusion that the maximum size a model ship that can be used with Hexon II can be is no more than 7.75″ x 2.5″ (20cm x 6cm). In other words, approximately the size of the Plasticard Cruiser.
Something to ponder on methinks!
