COW2005: The Guns of Toblerone (or who do you think will play me in the film?)
Posted: April 30, 2013 Filed under: COW (Conference of Wargamers), World War II 4 Comments
Ian Drury sets out the terrain.

The intrepid SOE team prepare to ‘take off’ in their ‘borrowed’ Ju82 … humming the tune from ‘Where Eagles Dare’. Trebian (near right) seems half asleep, Martin Rapier (near left) looks apprehensive, Tim Gow (in the green shirt) laughs in the face of danger … and I am sat behind Tim with my arms crossed!

Gavascone, the main town and seaport of Toblerone.

The Guns of Toblerone … which had to be destroyed!

Part of the objective: the Eagles Nest, headquarters of the German garrison on Toblerone.

The olive groves … where dirty deeds might (or might not) have taken palce!

The bridge, over which the survivors made their escape. I seem to remember that a motorcycle was crashed during the process … but I may be wrong.

The centre of one of the main towns on Toblerone. Stavros’ Bar was the rendevous point for the SOE team to meet the leader of the local resistance group.

The airfield … where a Ju82 might just be waiting to land in order to pick up any survivors.

Trebian making a point … but I cannot remember what it was.
COW2005: Fletcher Pratt Naval War Game
Posted: April 28, 2013 Filed under: COW (Conference of Wargamers), Naval Wargames, World War II 4 CommentsJohn ran a session at COW2005 where the rules were used, and the following photographs were taken during that session. The scenario featured a clash between the Imperial Japanese Navy and the combined forces of the the United States and Royal Navies.

The Imperial Japanese Navy sets sail.

Three Kongo-class battleships … or are they?

Two of the Kongo-class battleships and one of their escorts.
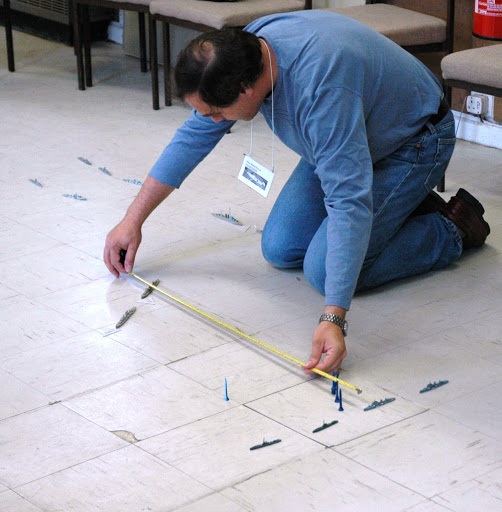
The current editor of The Nugget carefully measures the range from one of the British cruisers that is firing at a group of Japanese destroyers.

Once the range is measured, shell splashes (up-turned golf tees) are placed so that players can see how effective (or ineffective) their gunfire has been.

The red golf tee indicates a hit on one of the Japanese destroyers.

More hits … and even the misses are dangerously close!

A pair of Japanese battleships: a Yamato-class and a Kongo-class. The former had been ‘substituted’ for one of the original Kongo-class battleships once the battle had begun. Its appearance was a bit of a shock for the Allies!

Another hit on a Japanese destroyer.

HMS Exeter suffers a number of hits … but HMS Achilles seems to have avoided the attention of the Japanese gunners this time.
COW2005: Redcoats and Dervishes (or the Attack on Abu Hamed)
Posted: April 26, 2013 Filed under: Colonial, COW (Conference of Wargamers), Late 19th Century 2 CommentsThe scenario I chose for the sessions run at COW2005 was entitled THE ATTACK ON ABU HAMED, and it was based on a small battle that took place during the re-conquest of the Sudan.

Anglo-Egyptian forces (must enter on the top edge of the map)
- 4 infantry battalions (may be either British or Egyptian)
- 1 Artillery battery (may be either British or Egyptian)
- 1 Machine gun battery (may be either British or Egyptian)
- 1 Leader
Optional additional forces:
- 1 Gunboat [N.B. Used in the game that I ran]
- 1 Cavalry regiment (May be either British or Egyptian) [N.B. Not used in the game that I ran]
Dervish forces (situated anywhere on the plateau that surrounds Abu Hamed)
- 2 infantry rubs armed with firearms
Optional additional forces:
- 1 Artillery battery (must be set up facing the river) [N.B. Used in the game that I ran]
- 1 Cavalry rub armed with firearms (must be set up in the town of Abu Hamed) [N.B. Not used in the game that I ran]
Scenario specific rules
The Dervish infantry are deemed to be in trenches (i.e. cover) whilst on the plateau. However once an Anglo-Egyptian unit reaches the top of the plateau the Dervishes are no longer deemed to be in their trenches.
During the real battle a brigade of Anglo-Egyptian troops advanced on Abu Hamed. The defenders held off the Anglo-Egyptian attackers for a short time, but once the advancing troops had reached the top of the plateau surrounding the town, the defenders decamped.
In the game that I ran at COW2005 the Anglo-Egyptian infantry advanced in columns, whilst their artillery and machine guns moved up in support. The Dervish defenders held back from their trenches on the plateau, and dealt one Anglo-Egyptian unit a very nasty blow when it advanced over the top of the Dervish trenches and onto the plateau. The Dervishes then exposed themselves to the fire of the other Anglo-Egyptian units, and very quickly they became disorganised. In the meantime the Dervish artillery had been under fire from the Anglo-Egyptian gunboat for some time, and it also became disorganised. Realising that they could not win (i.e. they had reached their ‘break off battle’ point), the Dervishes withdrew from Abu Hamed.

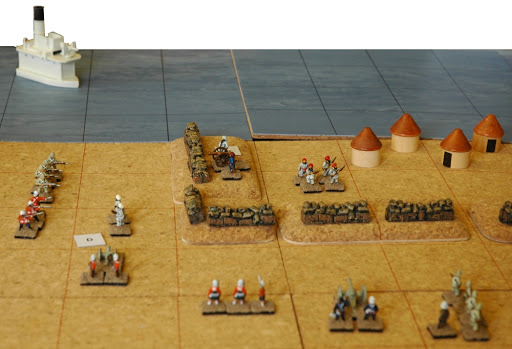
The village of Abu Hamed.

The British force enters the battlefield.

The British advance begins.

The British infantry deploy into columns so that they can move faster.

The British centre.

Another view of the British centre.

The British advance continues …

… and the gunboat engages the Dervish artillery.

One British unit (the Highlanders) has already begun to suffer casualties …

… just as the British artillery moves into position.

A Dervish infantry unit attacks one of the British infantry units …

… which they push back

… leaving them exposed to fire from the British machine gun.
The impetuosity of the Dervish infantry has left them in danger of being destroyed by fire from two British infantry units and a machine gun unit. At the same time the gunboat is beginning to move closer to Abu Hamed and the rest of the British force is poised to attack the remaining Dervish troops in Abu Hamed.
SALUTE 2005: Megablitz (or Lucky 7th)
Posted: April 24, 2013 Filed under: Megablitz, Wargame Shows, World War II 10 CommentsThe scenario was a simple one, and concerned a ‘race’ between various Combat Commands from the 7th Armored Division and the 9th Armored Division of the US Army to capture a vital bridge over a river. The players each took command of a Combat Command and the German defenders were controlled by the game umpires. The positions occupied by the Germans were indicated by small dice, and the type and strength of the German units was randomly generated when they came into contact with the advancing America forces.
The Combat Commands looked like this …

7th Armored Division.

9th Armored Division
… and the German defenders were drawn from these units.

The game was fought through several times during the day, and it was interesting to see the inter-action (or otherwise!) between the two American players as well as the ways in which they coped with the various German defenders.
The following photographs are a sample of those taken during the day.

Reconnaissance troops of the 7th Armored move forward.

The leading elements of 9th Armored pass a defending German unit … a field kitchen!
The 7th Cavalry in action.

A detachment from a German Fusilier unit (i.e. reconnaissance troops on bicycles!) are about to encounter the armoured cars of an American reconnaissance unit.

The Americans run into a traffic jam … cause by retreating German transport units.

The results of the traffic jam! Two armoured divisions are held up by a German horse-drawn transport unit.

Another view of the traffic jam. Where are the MPs when you need them?

Hopefully the bridge is not mined or heavily defended.

Oops! How did they get there? One result of the confusion of a retreat is that units from both sides end up in the same place at the same time.

Across the bridge in one piece!

Reconnaissance units of the 7th and 9th Armored Divisions reach the same place at the same time.

German air support is chased away by aircraft from the United States Army Air Force.

Ambush!

Another game, another traffic jam caused by a German horse-drawn transport unit.

One way to avoid the traffic jam is to go around it.

Some of the American reconnaissance troops run into a unit of Tiger tanks whilst others prepare to defend the bridge from a counter-attack.

A Combat Command on the move.

American armoured infantry.

American armoured infantry, supported by units of tanks and tank destroyers.
SALUTE 2005: Megablitz terrain
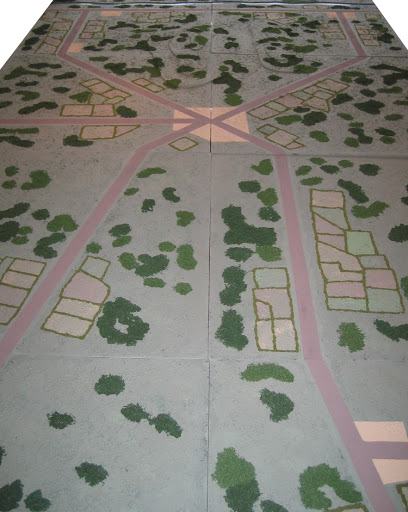
Posted: April 23, 2013 Filed under: Megablitz, Wargame Shows, World War II 8 CommentsI think that this was the first time that terrain had been specifically built for a MEGABLITZ game, and I created it from a combination of MDF (used for the base boards), cork tiles (used to create the hills and the river), paint (Dulux emulsion for the base colour and different ‘matchpots’ for the river, fields, roads, and built-up areas), and flock in a variety of different colours.
The resultant terrain looked like this:


COW2004: Heroes of Victoria’s Empire (HoVE) (or Carry On! Follow that, Kemal)
Posted: April 21, 2013 Filed under: Colonial, COW (Conference of Wargamers), Early 20th Century 14 CommentsThe scenario: Carry on! Follow that, Kemal
Deep in the desert of the Arab Kingdom of Khemed, a party of archaeologists, led by Professor Ronald Crump and his assistant Dr. Reginald Syde, is excavating the lost tomb of Tutankumup. The tomb is reputed to contain a vast treasure as well as evidence relating to the ancient methods of temple building.
The ruler of Khemed – Sheikh Abdul Abulbul – has ‘lent’ Professor Crump (for the princely sum of one thousand gold Sovereigns) a detachment of his army to guard the site. The Captain commanding these troops (an ex- Foreign Legion sergeant major named Marek Clotski) has also been given the secret task of ensuring that any discoveries are reported to the Sheikh. The Sheikh has also sent a large detachment of his army (commanded by another ex-Foreign Legionnaire, Major Michel Le Pice) to an oasis near the archaeologists’ camp. This is supposed to be there to guard the water supply, but its real task is to make sure that the Sheikh gets his share of any gold and jewels that are found in the tomb.
A local Bedouin chieftain (and rival for the throne of Khemed) – Sheikh Ahmet Ali – has heard that the ‘infidels’ are desecrating the holy tomb of Tutankumup, and is determined to stop it. With the help of a renegade British officer – Captain Lawrence ‘Kemal’ Keene – he has gathered together his most loyal warriors and is determined to attack the archaeologists’ camp. Once the archaeologists have been driven away – or killed – he intends to use the fact that Sheikh Abdul Abulbul has given his support to the ‘infidels’ to advance on Khemed City and overthrow the Sheikh

The area of operations.

A close-up of the profile mountains used during this game. They were built of thin plywood and balsa wood. The design is based on those built by David Gelber (AKA Major General Tremorden Rederring).

The action begins!

The archaeologists set up their camp next to the ruins …

… where they seemed to spend a lot of time talking …

… about what they were going to do.

In the meantime, Sheikh Ahmet Ali and his tribesmen advanced on the unwary ‘infidels’.

Sheikh Abdul Abulbul’s troops moved forward to meet the threat …

… but it was sometimes difficult to work out who was friendly and who was not!

Definitely unfriendly!
SALUTE 2003: The Die Hards
Posted: April 19, 2013 Filed under: Colonial, Late 19th Century, Wargame Shows Leave a comment


SALUTE 2003: Restless Natives
Posted: April 18, 2013 Filed under: Colonial, Late 19th Century, Wargame Shows 4 Comments
Digital cameras were not as good as they are now, and the quality of the photographs was – to say the least – variable. Here are some of the ones that were not too out of focus!
The Mahdists


The Anglo-Egyptians


Battle action!

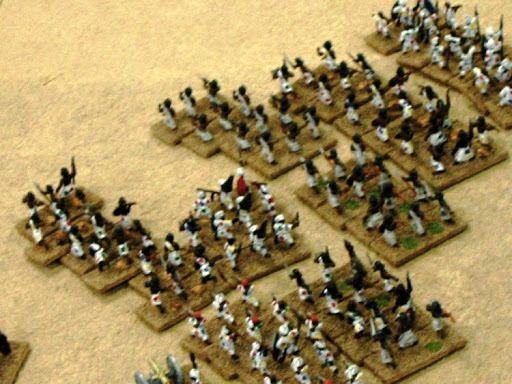


All of the figures were manufactured by Essex Miniatures and bought ready-painted from Miliart.
COW2002: The Sword in Palestine (or the Barber of Baghdad)
Posted: April 16, 2013 Filed under: Colonial, COW (Conference of Wargamers), Early 20th Century 6 CommentsThe battle revolved around an Anglo-Arab raid on a Turkish train … that was carrying the favourite barber of the Turkish General in charge of the defence of Baghdad. (The scenario might not have been a great one, but the battle was!)

The battlefield.
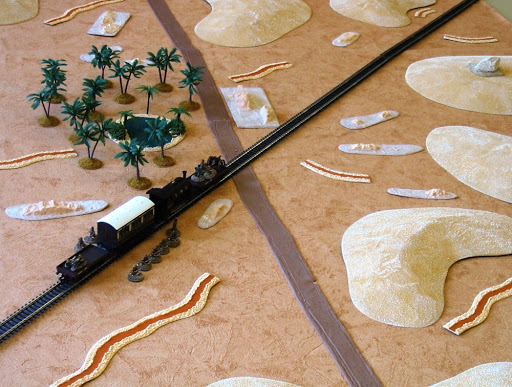
The oasis … where the train stopped to take on water.

When the train stopped the troops it was carrying deployed to defend it.

The train’s defenders included Infantry, a Machine Gun, and a Field Gun.

A column of Turkish Infantry.

The Turkish Field Gun and crew.

The Turkish Field Gun was mounted on the leading waggon of the train.

The defenders deployed to meet the threat of an Arab attack.

Turkish Infantry moving towards a sand dune.

Some of the Turkish Infantry moved along the road … but suffered casualties from Arab gunfire.

Some of the Turks took cover by the oasis.

British Rolls Royce Armoured Cars.

Arab Cavalry.

The Arabs moved forward with their Cavalry on the left.

Two Turkish Lancers mounted a counter-attack. The odds were not in their favour … but you could not fault their bravery!

The Turkish Lancers … or – more accurately – a Turkish Lancer and an Officer!

Having give the Arabs a nasty shock, the Turkish Lancers withdrew to safety …

… at the oasis.
COW2002: The Roads to Madrid (Spanish Civil War)
Posted: April 15, 2013 Filed under: COW (Conference of Wargamers), Early 20th Century, Spanish Civil War 10 Comments
The battlefield … before the battle began.

The battle begins.

The battle as seen from the other end of the tabletop.

The Convent of the Fallen Madonna … with the Big Boobies!

The village.

The roads to Madrid.

Fighting was fierce around the Convent.

Nationalist Infantry and Artillery in action.

Nationalist Artillery.

More Nationalist Artillery.

Nationalist Infantry and Artillery in action.

Nationalist Infantry and Artillery in action.

Fighting in the village.

The Spanish Foreign Legion: The Nationalist’s elite troops!

Cavalry still had a limited role to play.

A Republican T-26 tank.

A Nationalist T-26 tank.

A pair of Republican T-26 tanks.
